
The Site Installation Process: Watching Your Building Come Together in Days (2026)
Updated: Aug 26
The Site Installation Process: Watching Your Building Come Together in Days (2026)

For most clients, on-site installation is the single most exciting and visually dramatic stage of the entire prefab journey - the point at which manufactured components, until now abstract line items on a production schedule, become a recognisable building rising on your own land within days rather than months. This article walks through installation day by day, covering crane operation, connection sequencing, crew roles and what you should genuinely expect to observe if you visit your site during this stage, building directly on the parallel-track logic and transportation coordination this pillar's earlier Stage 2 articles have already established.
In This Guide You'll Learn
Introduction: From Components to Building in Days
Installation is where prefab construction's speed advantage becomes viscerally obvious rather than an abstract timeline figure - a foundation that sat empty is transformed into a recognisable structure within the first few days of this stage, a pace conventional construction simply cannot match for equivalent structural progress. This article assumes components have already arrived on site, following the transportation process this pillar's dedicated logistics article described, and walks through what happens from that point forward.
Day One: Site Setup and Crane Positioning
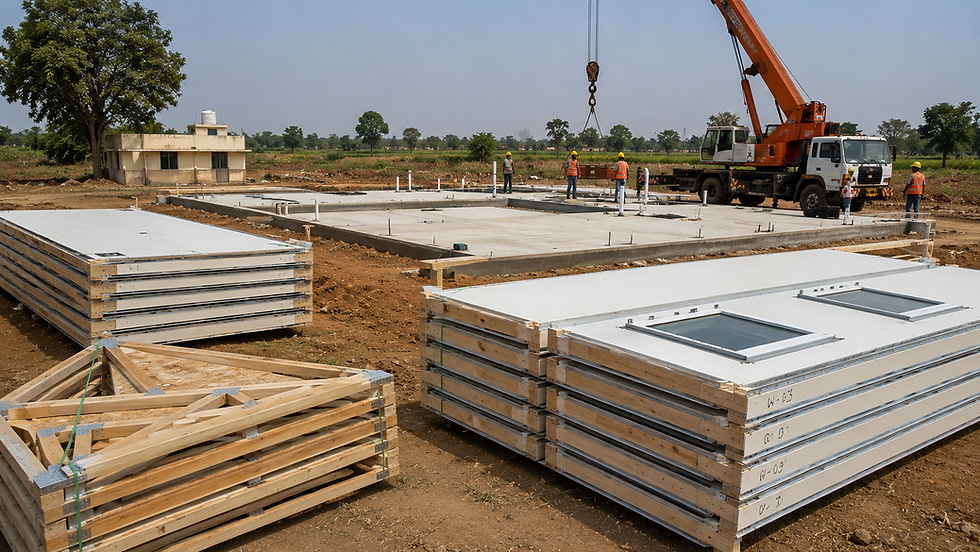
Installation typically begins with crew arrival, site safety briefing, and crane positioning - the crane operator and site supervisor confirming the crane's working radius covers every point on the building footprint where components must be lifted, exactly the site assessment consideration this pillar's transportation article flagged during route and access planning. Delivered components are typically organised on site in the sequence they will be needed, minimising unnecessary repositioning once erection begins.
Days Two Through Four: Wall Panel Erection
Wall panel erection typically follows a specific sequence - corner panels first, establishing the building's precise footprint and squareness, followed by remaining wall panels connected sequentially around the perimeter, each panel lifted by crane, guided into position by ground crew, and secured to the foundation and to adjacent panels using the connection points this pillar's manufacturing article noted are pre-punched at the factory stage against the exact digital design file specification.
How Panel Connections Actually Work
Panel-to-foundation connections typically use anchor bolts pre-positioned during foundation pouring, matched precisely to the panel's factory-manufactured connection points, while panel-to-panel connections use structural screws or bolts at engineered spacing, creating a continuous, structurally connected wall system rather than independent panels merely standing adjacent to one another.
💡 Loom Crafts Expert Insight — Clients watching their walls go up for the first time are often surprised by how quickly the building's actual shape becomes recognisable - by the end of day two or three, you can genuinely walk through what will become your rooms, even though roofing and interior finishing remain weeks away. It's an emotional moment for a lot of families, and one of the more rewarding parts of this work for our installation crews too.
Days Four Through Six: Floor and Roof Structure
With external and load-bearing internal walls erected and connected, floor cassettes for any upper storey and roof truss components follow, again crane-lifted into position and connected using the same engineered connection logic as wall panels, with roof structure typically completed and made weather-tight with underlayment membrane before internal finishing work begins in earnest, protecting the building's interior from any rainfall during the remaining installation period.
Days Six Through Ten: Roofing, Cladding and Weatherproofing
With the structural shell complete, roofing installation proceeds - Technonicol asphalt shingles over the waterproof underlayment for most Loom Crafts residential projects - alongside any remaining external cladding not already installed at the factory stage, and window and door installation if not factory-pre-fitted, bringing the building to a fully weather-sealed state.
Final Days: Interior Finishing and Utility Connection
The closing days of installation cover interior finishing work - flooring installation, interior paint or finish application, and connection of electrical and plumbing systems to the service routing this pillar's manufacturing article noted is pre-planned into factory-punched service holes - along with fixture installation for kitchens, bathrooms and any built-in elements the design specified.
Crew Roles on an Installation Team
A typical installation crew includes a site supervisor coordinating the overall sequence and quality verification, a certified crane operator, ground crew guiding and securing panels during lift and connection, and specialist trades for electrical, plumbing and finishing work who typically join during the later installation days once the structural shell is complete and weather-sealed.
Weather Considerations During Installation
While the structural shell is being erected, before roofing provides weather protection, installation crews monitor weather conditions closely, since high winds specifically can affect safe crane operation with large panels, and heavy rainfall can affect both safety and the practicality of certain connection work. Experienced crews build reasonable schedule flexibility into the installation timeline to accommodate occasional weather-related pauses, exactly the buffer this pillar has emphasised as sound practice throughout the broader project timeline.
What a Client Should Expect to See, Day by Day
For a client visiting their site during installation, the practical expectation across roughly one to two weeks looks like this: an empty foundation on day one, a recognisable wall outline by day two or three, a fully enclosed structural shell with roof framing by roughly day five or six, a weather-sealed building with roofing and cladding complete by day eight or nine, and a finished, walkthrough-ready home by the final day or two - a visible, week-by-week transformation considerably more dramatic than the comparatively invisible progress conventional construction shows during its equivalent structural stage.
Quality Verification During Installation
Installation is not simply mechanical assembly - it includes its own quality verification checkpoints, distinct from but connected to the factory quality process this pillar's dedicated quality control article describes in detail. Site supervisors verify each panel's connection integrity as it is secured, check overall structural squareness and level at key stages such as completion of the wall perimeter, and confirm that utility service routing aligns correctly with the factory-punched service holes this pillar's manufacturing article noted are pre-planned into structural components, catching any discrepancy before finishing work proceeds and makes correction more difficult.
Documentation During Installation
A well-run installation process documents progress at each major milestone - photographs of completed structural connections, confirmation of utility integration, and final walkthrough documentation before handover - creating a record that supports both immediate quality assurance and, should it ever be needed years later, verification of what was actually built against the original design specification, connecting back to the material traceability and documentation discipline this pillar's factory articles have emphasised throughout.
Coordinating Multiple Trades During Finishing Stages
The final installation days, when electrical, plumbing and finishing trades join the site alongside the core installation crew, require genuine coordination to avoid the sequencing conflicts that can otherwise slow conventional construction's finishing stages considerably - electrical rough-in generally needs to happen before wall finishing closes access to service routing, plumbing connections need coordination with fixture installation timing, and flooring installation typically happens after other finishing work to avoid damage from ongoing construction activity. A well-organised installation schedule sequences these trades deliberately, rather than allowing the kind of trade conflicts and rework that poor coordination on a conventional site frequently generates.
💡 Loom Crafts Expert Insight — The finishing stage of installation, while less visually dramatic than watching walls go up, is where a poorly coordinated project can actually lose the most time - an electrician and a flooring crew working the same space on the same day, for instance, creates exactly the kind of conflict that adds unplanned days to a schedule. Our site supervisors sequence these final trades as deliberately as the structural erection itself, precisely because this stage's coordination discipline is what actually protects the overall project timeline from slipping in its final days.
Safety Protocols During Crane Operation
Crane operation during panel erection carries genuine safety considerations that a professional installation crew manages through specific, disciplined protocol rather than informal caution alone. This includes establishing a clear exclusion zone around the crane's working radius that ground crew and any site visitors, including the client, must respect during active lifting operations, verified load calculations confirming the crane's rated capacity comfortably exceeds each specific panel's actual weight before any lift begins, and clear hand-signal or radio communication protocols between the crane operator and ground crew guiding each panel into position, since a large wall panel suspended mid-air responds to wind and positioning adjustments in ways that require precise, unambiguous coordination between everyone involved in the lift.
For a client visiting during installation, respecting the exclusion zone your site supervisor establishes, and following any specific safety guidance given upon arrival, matters considerably more than it might initially seem - not as a bureaucratic formality, but because active crane operations genuinely warrant that level of discipline for everyone's safety on site during those specific windows of the installation process.
How Installation Differs Between Single Homes and Multi-Cottage Resorts
For a hospitality developer building multiple cottages, installation sequencing shifts considerably from the single-building sequence this article has described in detail. Rather than one crew completing one structure start to finish, installation across a multi-cottage development typically proceeds with the crane and core structural crew moving systematically between foundations, erecting each cottage's structural shell in turn before finishing crews follow behind to complete interior work, allowing the most expensive and specialised equipment and labour - the crane operation itself - to work continuously across multiple units rather than sitting idle while a single cottage's finishing work proceeds.
Sequencing Logic for Multi-Unit Installation
This sequencing logic, coordinated with the phased delivery approach this pillar's transportation article described for multi-cottage projects, generally means a resort development's overall installation period extends longer in total than a single home's one to two weeks, but achieves considerably better efficiency per unit than if each cottage were installed entirely independently and sequentially, exactly the scalability advantage this pillar's cost and comparison articles identified as a genuine reason prefab construction suits hospitality development so well.
💡 Loom Crafts Expert Insight — On a recent resort project, our crane and structural crew erected all eight cottages' shells across roughly three weeks, moving methodically foundation to foundation, while a second finishing crew followed a few days behind completing interior work on each cottage as its structural shell was completed. This staggered, parallel approach meant the developer's first cottages were substantially finished while the last were still being structurally erected - a genuinely different rhythm from a single home's more linear installation sequence, and one worth understanding clearly if you're planning a multi-unit development.
How Installation Adapts to Difficult Terrain
Installation on hill station or otherwise terrain-constrained sites, where Loom Crafts has completed projects across locations including Coorg, Ooty and Spiti Valley, requires adaptations beyond the standard sequence this article has described for a typical flat site. Crane positioning on sloped or uneven ground may require additional ground preparation or outrigger support to ensure stable, safe operation, and in some cases, a smaller, more manoeuvrable crane suited to constrained access may be used in place of a larger standard unit, trading some lifting capacity for the ability to actually position the crane where the site's terrain allows.
Material staging on constrained hill sites similarly requires more careful planning than a flat, spacious plot demands, since there is often less available space to store delivered components awaiting installation, making the phased, sequenced delivery approach this pillar's transportation article described particularly valuable on exactly these kinds of challenging sites - components arrive closer to the specific day they are needed, rather than requiring extensive on-site storage space a constrained plot may simply not have available.
Weather Sensitivity in Hill Installation
Hill station installation also carries heightened weather sensitivity beyond the general considerations this article discussed earlier, since sudden weather changes at altitude, including fog affecting visibility for crane operation and temperature swings affecting certain connection and sealing work, require installation crews experienced specifically with these conditions rather than assuming standard plains-based installation practice transfers directly to a mountain site.
The Emotional Experience of Watching Your Home Come Together
Beyond the technical sequence this article has documented in detail, it is worth acknowledging directly that installation is, for most clients, a genuinely significant emotional experience - the moment a project that has existed as drawings, specifications and factory progress updates finally becomes a physical, walkable structure on land that may have been in a family for generations, or that represents years of saving toward a long-held dream. Many clients choose to be present for at least part of installation specifically for this reason, and manufacturers experienced in residential work generally understand and accommodate this, coordinating with clients on the best days to visit for the most visually meaningful moments - typically the initial wall erection days when the building's shape first becomes apparent, and the final walkthrough when the completed home is formally handed over.
💡 Loom Crafts Expert Insight — We've had grandparents travel considerable distances specifically to watch a family's ancestral farmland finally see a new home rise on it, and clients who've simply sat quietly on-site for hours watching walls go up, clearly moved by the moment. Installation, for all its technical process, remains a genuinely human milestone for the families we work with, and it's a part of this work our crews take real pride in being part of, beyond the purely engineering achievement this article has otherwise focused on.
Frequently Asked Questions (FAQs)
1. How long does on-site prefab installation take?
Typically one to two weeks depending on project size and complexity, from initial crane setup through final interior finishing and utility connection.
2. Do I need a crane for prefab installation?
Generally yes for panelised LGSF construction, to lift wall panels, floor cassettes and roof trusses into position, with crane access assessed during initial site evaluation.
3. Can I visit my site during installation?
Yes, most manufacturers welcome client visits during installation, and many clients find watching the structural shell take shape one of the most rewarding parts of the process.
4. How are wall panels connected to the foundation?
Using anchor bolts pre-positioned during foundation pouring, matched precisely to the panel's factory-manufactured connection points established during the design and manufacturing stages.
5. Does rain delay installation significantly?
Heavy rainfall can pause structural work before roofing is complete, which is why realistic installation timelines build in reasonable weather buffer rather than assuming uninterrupted progress.
6. What happens after the structural shell is complete?
Roofing, cladding and weatherproofing follow, then interior finishing including flooring, paint, electrical and plumbing connection, and fixture installation in the closing installation days.
7. Who is on a typical installation crew?
A site supervisor, certified crane operator, ground crew for panel guidance and connection, and specialist electrical, plumbing and finishing trades joining during later stages.
8. How quickly does the building become recognisable during installation?
Often within the first two to three days, once corner and perimeter wall panels are erected and connected, establishing the building's visible shape and room layout.
Conclusion
On-site installation is where every earlier stage this pillar has described - design, manufacturing, transportation - culminates in a visible, dramatic transformation, typically completing in one to two weeks what conventional construction would require months to achieve for equivalent structural progress. Understanding the day-by-day sequence this article has walked through equips you to know what to expect, when to visit, and what questions to ask if your specific project's installation progress ever seems to deviate from this typical pattern.
📌 Add Loom Crafts Prefab as a Preferred Source on Google to see more of our guides in Top Stories and AI search.
Continue Reading
Continue Your Stage 2 Journey
Popular Answers and Deep Dives
Ready to Build Your Dream Home?
Loom Crafts Prefab installation crews bring your home from foundation to finished structure in days, not months. We support home builders with:
Experienced crane operators and installation crews across varied terrain
Clear day-by-day progress visibility during your installation period
Weather-aware scheduling that protects both safety and quality
One to two week installation timelines for most residential configurations
A 20-year structural and rain-leakage warranty at handover
Call Us: +91 84484 40556 | Email: info@loomcrafts.com
📅 Prefer a live walkthrough? Book a free online demo at a time that suits you — our team will take you through designs, 2026 pricing and the complete build process on a video call: Book Your Online Demo
Important Disclaimer
This article is provided for general educational purposes only. Installation processes, timelines and practices described are indicative, vary by manufacturer, project and site, and change without notice. This content does not constitute engineering or safety advice. Always confirm specific installation practices directly with your manufacturer.


Comments